Last year, I published some cheat scripts for the web game digdig.io. The game’s entire source code is compiled down to WebAssembly (WASM) which makes it a lot harder to cheat than other web games that just use minification or obfuscation to protect the game’s source code. In this article, I will be explaining how I created cheats for the game that directly messed with the game’s WASM. Here’s a list of all cheats I made for digdig.io (mods not included. Scripts that mess with WASM are in italics):
I will be explaining the development of the x-ray and minimap scripts. Like my last explanation article, this post will also be split into 3 parts. The first part will cover the basics of working with WASM. Second and third, the development of x-ray and minimap.
NOTE: To view source code of a script, go under the Code section on its greasyfork’s page.
Table of Contents
1. Working with WASM
1.1 How do you read through WASM?
Through your browser’s dev tools. It automatically converts the WASM into a human-readable format called WASM Text (WAT). If you aren’t familiar with WAT, this article is highly recommended.
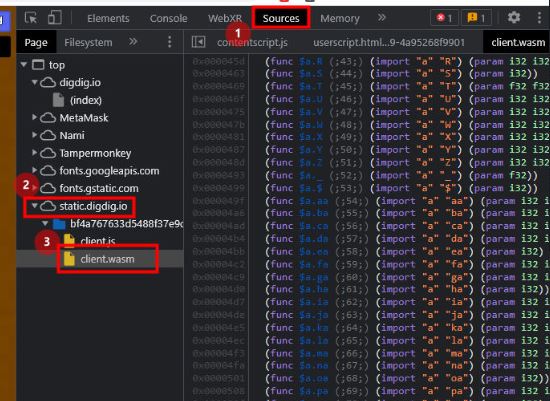
There are ways to even convert WASM into a more human-readable format called AsmJS. But I find working with WAT easier than working with AsmJS.
1.2 How does a WASM game work?
The WASM side of the game handles all the logic and the JS side does all the I/O stuff. These two parts communicate with each other through shared memory. I/O stuff here could refer to getting inputs from the user (key presses, mouse events, etc), receiving/sending packets through WebSocket, or drawing a circle on the screen. The WASM side does all the complicated calculations and decides when to tell the JS side to draw something on the screen or send a packet through the internet. If we somehow manage to change a bunch of instructions in the WASM, we can easily trick the game into rendering every tile without fog or leaking out some data that will be enough to create a minimap.
1.3 How do you modify WASM?
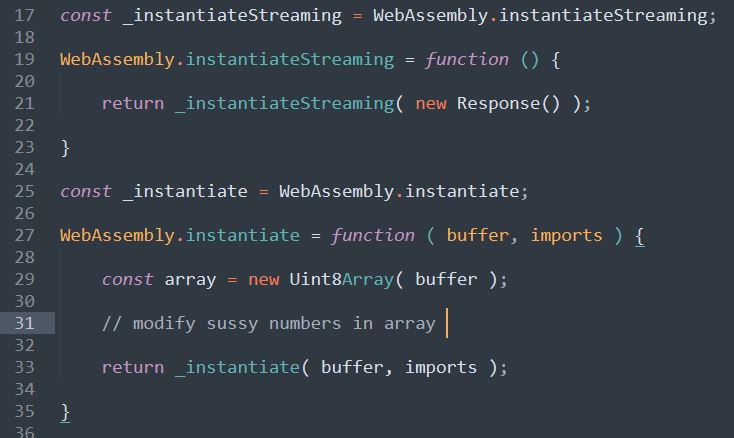
WASM in one way is just the WAT compiled down into numbers (or bytes) matching each instruction with its opcode. It also has some additional data but we don’t need to worry about them. Changing bytes is essentially modifying the WASM. DigDig.IO tries to load the WASM asynchronously using instantiateStreaming(). This isn’t good for us cos we need to have access to the full loaded WASM file before we can modify it. If we somehow fail the asynchronous load attempt, the game will fall back to using instantiate() after loading the full file. The code below does this and gives us access to the raw bytes of the file.
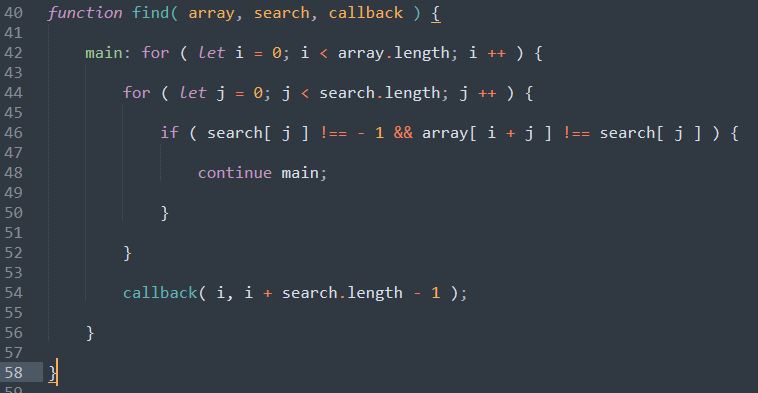
Here is a function that comes in handy while finding some code chunk in WASM and replacing it.
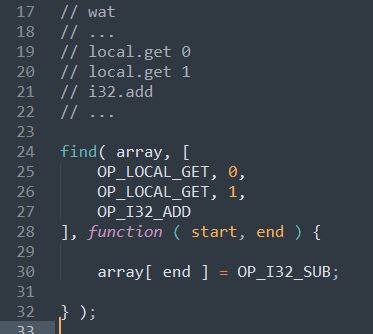
Since WASM files are just numbers, you need to know the opcode for each instruction to write searches for the above function to find and while replacing code. Luckily, there is a library called WAIL.js that offers all the opcodes. Here’s an example of finding and modifying a simple WASM code:
1.4 How do I find what to modify?
By adding breakpoints on the JS side and then looking through the call stack. For example, if you add a breakpoint near fillRect, and then click on a WASM function from the call stack, it will show you the WAT code which calls it.
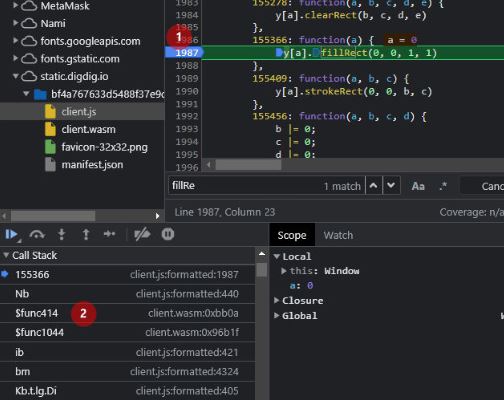
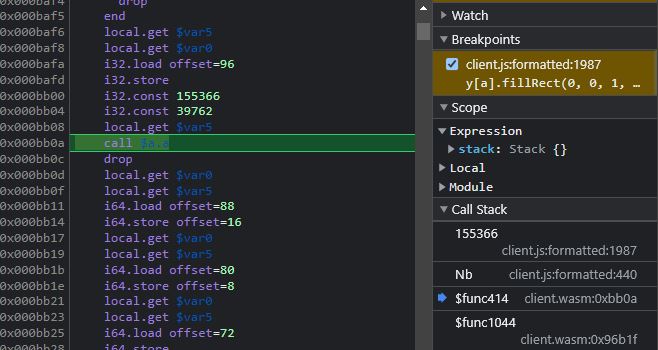
This simple example doesn’t reveal any useful code. In the real world, you will have to put breakpoints in some conditional blocks to find something useful. You will have to create these conditional blocks yourself. Where will you create them? You can create them in a proxy for fillRect or arc for example. You will see how I used this method to find WASM code to modify for creating the minimap later in this article. Time to move on to the next part!
2. Making X-Ray
What does this script do? It removes the fog of war from the game and lets you tiles/players which you aren’t supposed to see. A more detailed explanation is provided in this post.
2.1 What to look for in WASM?
The game uses Dijkstra’s shortest path algorithm to do the fog effect. The algorithm involves distance increments which are different for each tile in the game. You can see more through ores than dirt (ores have smaller increments). If the shortest distance to the tile is greater than a threshold value, the tile is not visible. So you are essentially looking for a switch statement here that determines the increment for each tile. Somehow making the increment 0 for every tile will remove the fog.
2.2 How can you find the switch statement?
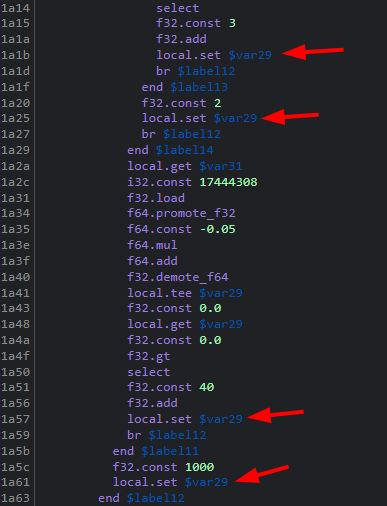
There are two things that you need to know to find it. First, switch statements are identified by the opcode br_table in WASM. Second, to give the fog a circular look, the game has to use the square root of 2 (~1.414) somewhere. Why? Cos each diagonal distance increment has to be a multiple of that. Why? Cos Pythagoras theorem. Searching for ‘1.414’ shows that there is only one occurrence of it and that the value is stored in $var30. If you scroll down a bit further, you will indeed find a br_table.
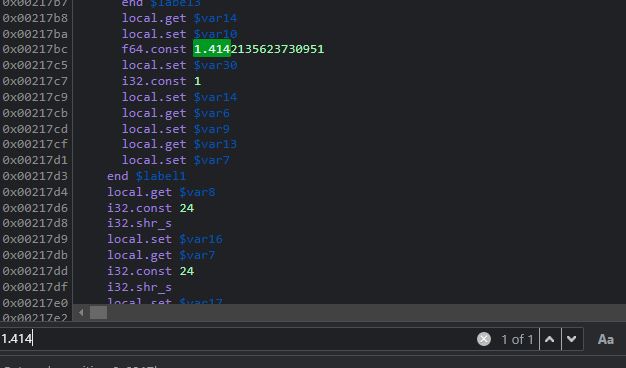
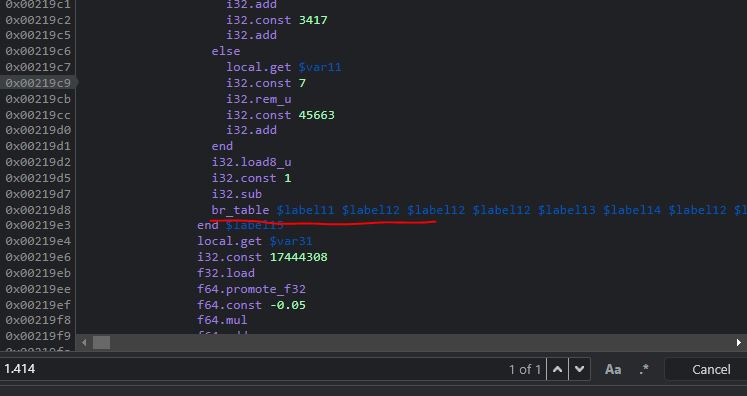
You will notice that all the blocks here end with some value getting stored in $var29. This is the distance increment I was talking about.
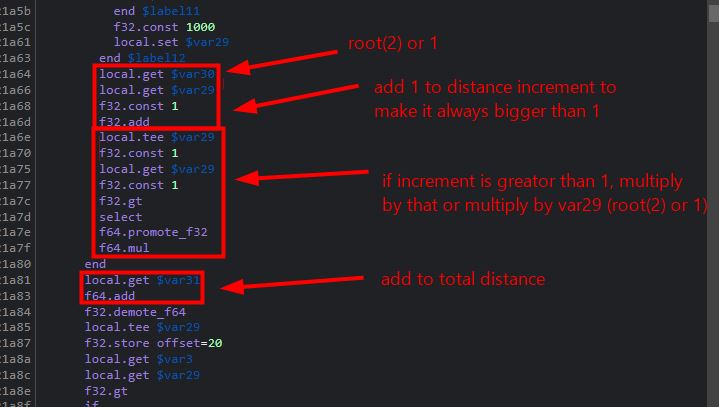
Now how do we verify this was indeed the right switch statement we were looking for? Scroll down a bit more and you will see some code that multiplies $var30 (root(2) or 1) with $var29 (distance increment) and then adds it to another variable (the total distance).
2.3 How do we make the increment always 0?
You can do it by overriding the br_table to always break to a block that returns a constant value and then modify this constant value to make the smallest possible increment. The following code overrides the br_table to break to the highlighted block.
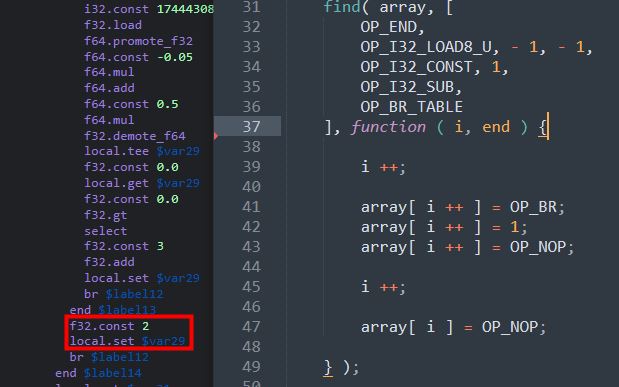
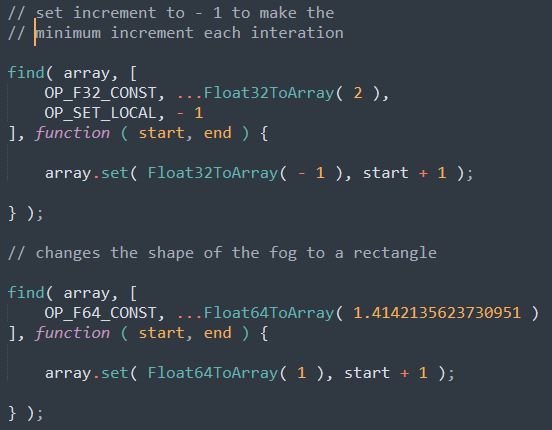
Then the first find() in the code below modifies the f32.const 2 instruction to f32.const -1 to give the smallest possible increment. The second find() removes the circular effect from the fog by replacing root(2) with 1.
That is all that was needed for the X-Ray. Moving on to the final part of the post.
3. Making the minimap
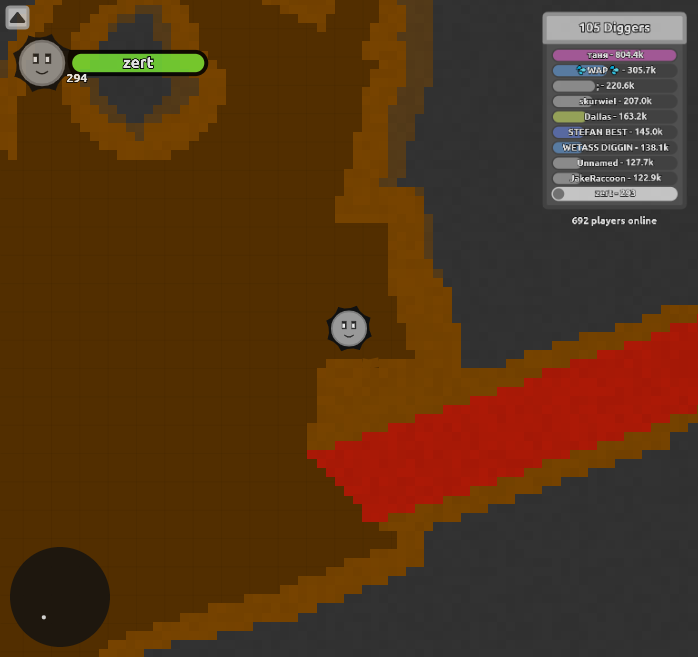
This is much simpler than the x-ray script. The core idea behind this is that if you make the arena borders always render to the screen, then your screen’s center will be your position. We won’t need to worry about any arena size or position change that happens in the game. The game always renders our local player at the center of the screen and the arena borders are transformed accordingly. The center and radius of the arena will be leaked through draw calls.
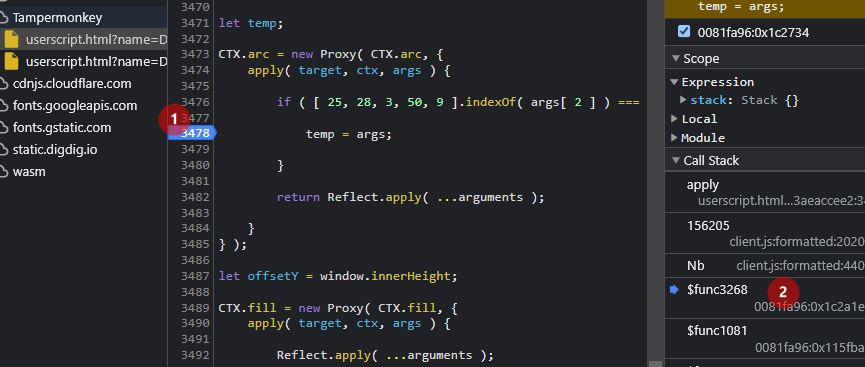
What WASM code do we need to find? The check that prevents borders from rendering if they are out of sight. How do we find it? This time we will be using breakpoints. This proxy identifies draw calls for borders. Adding a breakpoint in the if condition and going near the edge of the arena reveals all the secrets.
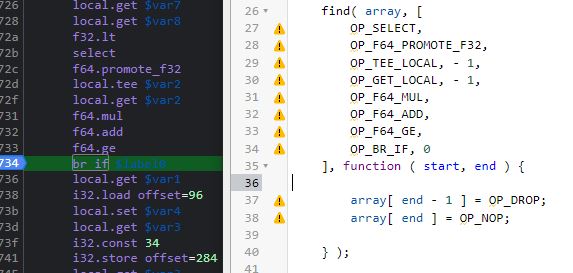
Scrolling up a little bit in the WASM function to find a br or br_if instruction gets us to this chunk of code. This is the code that is responsible for only rendering borders if they are in sight. Both the WAT and JS code for bypassing that check are present below:
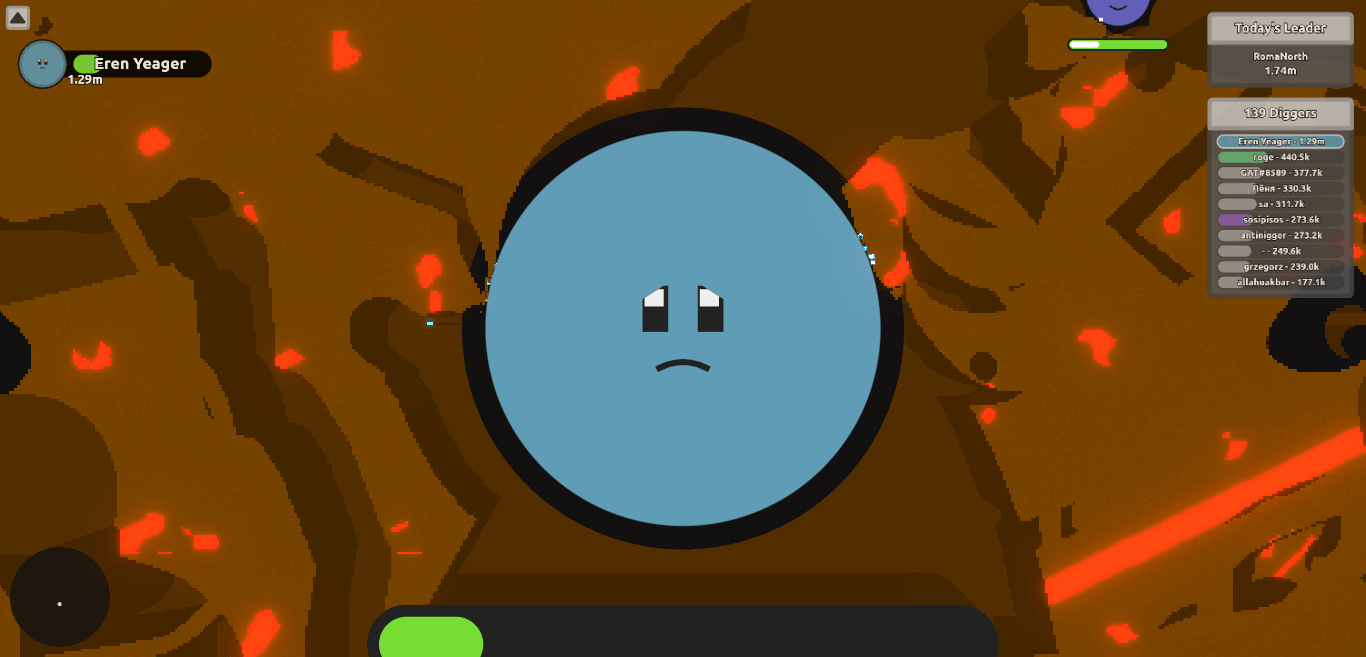
The code for rendering the minimap is pretty straightforward. I won’t be going into the details of it. It just converts the screen’s center to -1 and 1 using the screen space center and radius of the arena that we get from draw calls and uses that to draw a point in a circle that represents the full arena.
That is all for now. Thank you for reading! Keep scripting!
very good (:
very gud
Very nice i like it.
nice
wah martabi
can u make a shoot though walls script for shellshockers
nice
i got banned lol
beyond OP. good job
It is nice
I’m THE KING OF KILLER’S NOW AND I GOT MORE KILL’S THAT MY HOLE
CLASS AND I AM ONE OF THE BEST PLAYER IN MY SCHOOL AND EVERY LEVEL I KNOW HMHMHM_HAHAHAHAHAH_LOL BUT THANk YOU AIMBOT FOR MAKING ME UNSTOPPABLE LOL.
AMAZING
perfect
Boss
Ok this is insane
Dude this is awesome!
So fun!!!
Cool
lol cool
This hack is one of the only few that work.
Its awesome and you must get it if you are a hacker.
this hack is the fucking best
hi wow thanks
very nice !
me gusta seguir pero.. me gusta jugar y estudiar 🙂
Great post! Im surely sharing this with my friends! Had fun reading it indeed.
love it
i love it good job
thx
good hacks!
hi
Good cheat
This hack id so good it gave me a 41 kill streak and it also made it easier fo rthe BWD 1v1
great
esta muy bueno pero deberian mejorara algunas cosas
nicee verrry nice
good man
thank you
GOOD
thanks so much
its good 😀